NAVIGATING CONTACTS TAB
CLICK BELOW TO WATCH the walkthrough
Contacts Tab
1. Contacts Overview
The Contacts module is the central database for every lead, customer, and prospect inside Jobvizer CRM. Each contact record stores standard information (name, phone, email, address) alongside any custom data you configure for your business. From this module you can search, filter, tag, message, and take action on any contact or group of contacts.
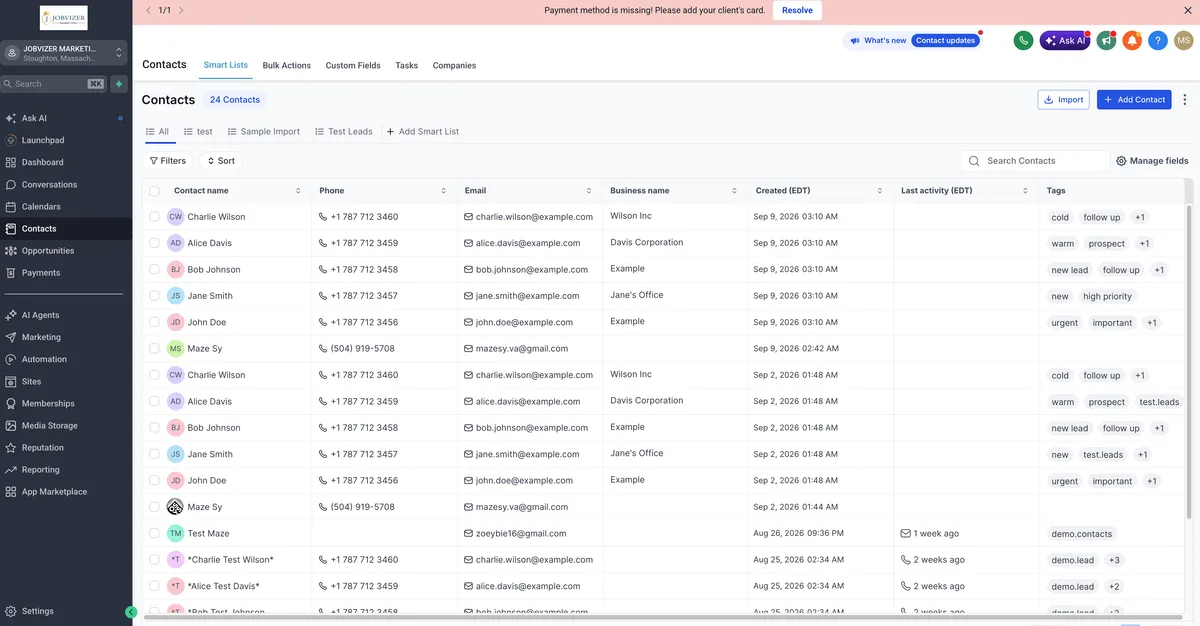
To access it, open the left-hand navigation menu and select Contacts. This brings up your full contact list with search, filter, and view controls at the top.
Custom Fields
2. Custom fields let you capture information unique to your business that isn't covered by the standard contact record, things like lease renewal dates, policy numbers, referral source, or product interest.
How to set them up:
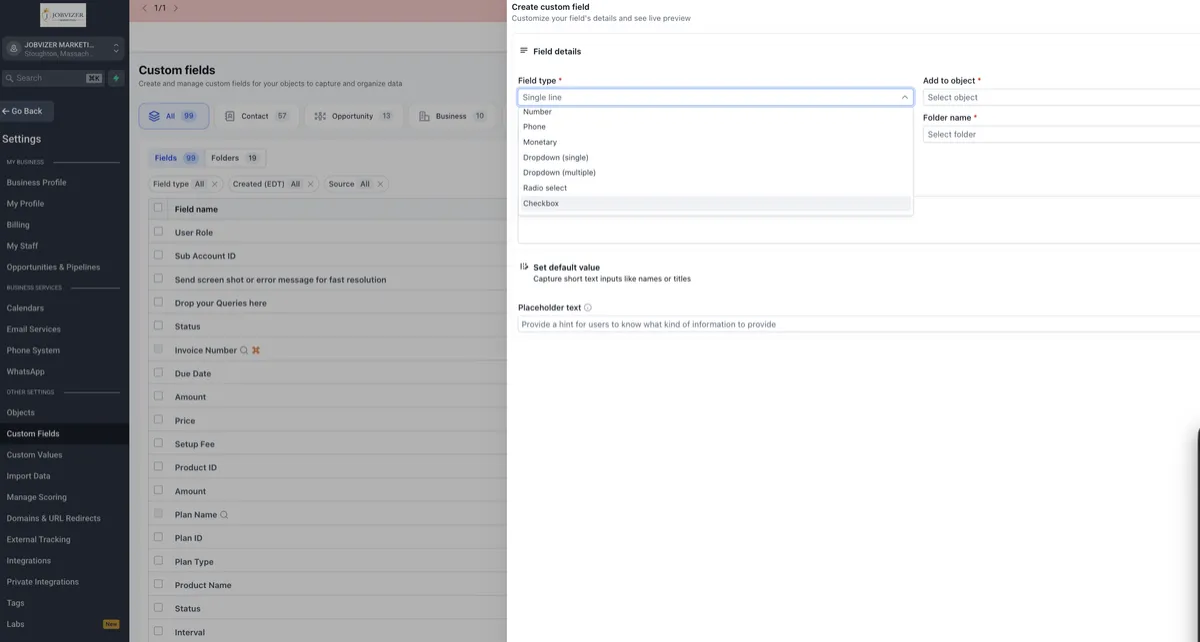
Go to Settings > Custom Fields.
Click Add Field.
Choose a field type: text, number, date, dropdown, checkbox, radio select, or file upload.
Name the field clearly (this label appears on every contact record and in your forms).
Assign the field to a folder or category to keep your settings organized as you scale.
Save. The field is now available on every contact profile and can be used in forms, workflows, and smart lists.
Best practice:
Group related custom fields into folders (for example, "Lease Info" or "Policy Details") so your team can find them quickly on a busy contact record.
Smart List
3. Smart Lists are saved, dynamic filters that automatically update as contacts meet or fall out of your criteria. Instead of manually searching every time, you build the filter once and the list stays current.
How to build one:
From the Contacts view, click Smart List at the top of the table.
Click Add Filter and choose the condition, this can be based on tags, custom field values, pipeline stage, source, date added, engagement activity, or nearly any other field in the system.
Stack multiple filters together using AND/OR logic to narrow the list precisely (for example: "Tag = Hot Lead" AND "Custom Field: Move-In Date is within 30 days").
Name and save the Smart List. It appears in your sidebar for one-click access going forward.
Common use cases:
Building a list of contacts who haven't been contacted in 7 days, isolating contacts by lifecycle stage, or segmenting a list for a targeted campaign.
Import
4. Bringing an existing contact database into Jobvizer CRM is straightforward and doesn't require any technical background.
Steps to import:
Go to Contacts > Import Contacts.
Upload your file (CSV format is standard).
Map each column in your file to the matching field in Jobvizer CRM (name, phone, email, custom fields, etc.). The system will attempt to auto-map recognizable columns.
Choose whether to apply a tag to all imported contacts, this makes it easy to identify and manage that specific batch later.
Review the import summary, which flags duplicates, missing data, or formatting issues before anything is finalized.
Confirm the import. Contacts populate into the system and are immediately searchable, taggable, and ready for automation.
Tip:
Always tag an import batch on the way in. If something needs to be corrected or reversed, a clean tag makes it easy to isolate that exact group.
Sharing & Permissions
5. Jobvizer CRM allows account owners to control exactly who sees what, which is essential once a team grows beyond one or two users.
Key controls:
User Roles: Assign each team member a role (Admin, User, or a custom role) that determines their level of access across the account.
Contact Visibility: Restrict certain users to only view contacts assigned to them, rather than the full database.
Field-Level Permissions: Certain custom fields can be hidden from specific roles if the data is sensitive.
Sharing Contacts: Contacts (or entire Smart Lists) can be shared with specific team members or teams, giving them access without changing overall account permissions.
Where to manage this:
Go to Settings > My Staff to control user roles and permissions, and use the Assign function within a contact or list to share access with a specific person or team.
Bulk Actions
6. Bulk Actions let you apply a change to many contacts at once instead of updating records one by one.
How to use them:
From the Contacts view (or a Smart List), select the checkbox next to each contact you want to act on, or select all.
Click Bulk Actions at the top of the table.
Choose the action: Add or remove a tag Add to or remove from a campaign Add to a workflow Change owner/assignment Export selected contacts Delete selected contacts
Confirm the action. Jobvizer CRM processes the change across every selected contact.
Best practice:
Combine Smart Lists with Bulk Actions for the cleanest workflow, filter first to isolate exactly the group you want, then apply the bulk action to that filtered list rather than the whole database.
More Ways to Manage Contacts
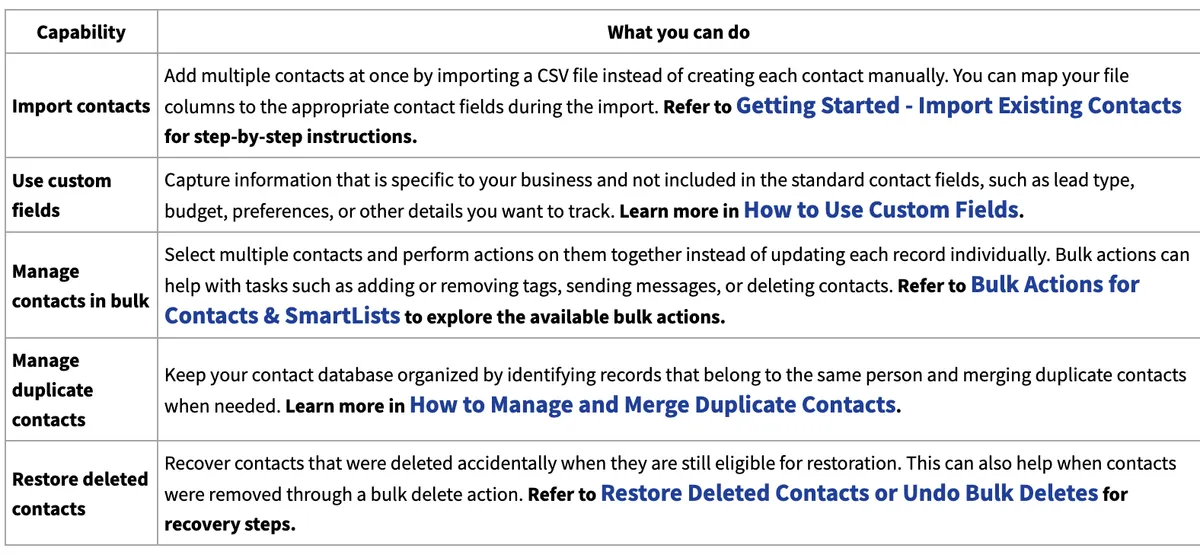
This walkthrough covers the core of the Contacts module. Each of these features (Custom Fields, Smart Lists, Import, Sharing & Permissions, and Bulk Actions) works together: fields feed your filters, filters build your lists, and lists power your bulk actions and automations.
JOBVIZER MARKETING SUPPORT PORTAL© 2026ALL RIGHTS RESERVED